Six Months with My Creality K1
You know, it's wild to think it's already been half a year since Christmas morning 2024. I still remember putting that giant box under the tree and knowing it was the Creality K1 3D printer. It was a present for me, to me after all. Like a lot of folks, I'd devoured all the reviews, watched countless YouTube videos, and just imagined all the cool stuff I could make. The promise of zippy, top-notch printing was super exciting, and I couldn't wait to get it fired up. Fast forward six months, and I can honestly say this printer hasn't just met my expectations; it's become a key player in how I create things. It’s been a total champ, just cranking out prints reliably with amazing detail. From that first, slightly nerve-wracking unboxing to now casually starting prints from my phone, it’s been a blast.
Getting it set up, which can sometimes be a real headache with 3D printers, was surprisingly smooth. Creality definitely did their homework to make getting it out of the box and running pretty painless. Before I knew it, I was tapping away on its slick touchscreen and running the first calibrations. Those auto-leveling and input shaping features everyone raves about? They worked like a charm, setting me up for a bunch of successful first layers, and any 3D printing fan knows how crucial that is! The enclosed design was another instant win for me. Not only does it look more like a sleek appliance than some tinkerer's project, but it also keeps the printing environment stable, which is a big deal for certain types of filament. The anticipation for that very first test print, the classic Benchy of course, was huge. Watching the K1 zoom to life at its advertised speed was just… mesmerizing.
So, this isn't just me listing specs; it's more like sharing my diary from the first six months with a machine that’s genuinely wowed me. We'll get into how it handles the daily grind, the different filaments I’ve played with, and my thoughts on the Creality Cloud service. If you're thinking about getting a K1, or just curious what it’s like to actually live with one, stick around!
The K1 is a Printing Rockstar!
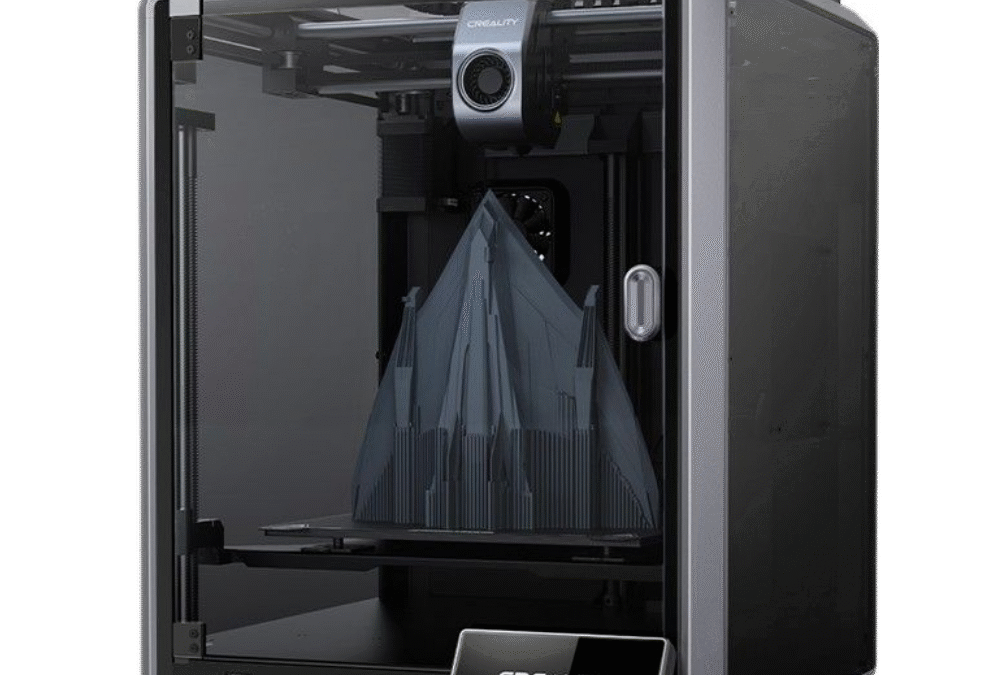
Let's be real, the true measure of a 3D printer isn't just what it says on the box or how cool it looks in the demos. It’s all about how it performs, day in and day out, over the long haul. And after six months, my Creality K1 has absolutely earned its stripes as a performance and reliability rockstar. The first thing that just blows you away is the speed. Creality talks about speeds up to 600mm/s, and while I haven’t busted out a stopwatch for every print, believe me, this thing is FAST. Coming from older printers, the difference in print time for similar objects is night and day. Stuff that used to be an all-night job can now be done in just a few hours. That’s not just convenient; it actually changes how you work, making it way faster to try out new ideas and experiment.
But what good is speed if your prints look like a mess, right? Thankfully, the K1 really delivers on quality too. My prints are consistently clean, the layers stick together well, and the detail is pretty darn impressive. The CoreXY system, along with those smart features like input shaping that cut down on wobbles and imperfections, really does its job. Whether I'm printing tiny, detailed figures, strong mechanical parts, or just some fun decorative stuff, the K1 handles it all like a pro. I’ve made things with tight fits, parts that snap together, and items with smooth, flowing curves, and I've rarely been disappointed. The nozzle and hotend that came with it have held up great, no signs of wearing out even with all the use.
One of my absolute favorite little perks is getting those cool timelapse videos of my prints. The K1 (sometimes you need an optional camera, or you can hook up your own) makes this super easy through the Creality Print slicer or their Cloud service. There's just something so satisfying about watching a complex model magically appear, layer by layer, in a sped-up video. It's not just for show either; it's actually a great way to troubleshoot. If a print messes up, I can often look back at the timelapse and see exactly when and where things went sideways, saving me a ton of guessing. Plus, they're awesome for showing off your creations online. Who doesn’t love a good print timelapse?
Durability has been another big plus in my book. Over these six months, the printer has been chugging along pretty regularly, sometimes running for days straight on bigger projects. I haven’t had any major breakdowns or seen the print quality dip. Basic upkeep has been super minimal. This usually just involves keeping the build plate clean, making sure the Z-axis lead screws are greased up, and now and then checking the belt tension. This kind of reliability really speaks to how well-built it is. The frame feels really solid, and all the parts seem to be good quality. A lot of people online say the same thing, pointing out that the K1's sturdy build is a big advantage compared to some flimsier competitors. Now, no printer is perfect. Early on, some folks in the community talked about issues with extruder wear on some K1s, but it looks like Creality sorted those out with newer versions, and mine has been totally fine in that department. The enclosed design also helps keep dust and gunk out of the moving parts, which definitely helps it last longer. Knowing I can rely on it without constantly having to tinker has let me focus on what I want to print, not if the printer can handle it.
And it’s not just easy to set up; it’s easy to use day-to-day. The touchscreen is quick to respond, and the menus are pretty intuitive. Getting models ready with Creality Print (or other slicers like Cura or OrcaSlicer, once you set them up) is a piece of cake. Sending files over Wi-Fi is super smooth, and the printer heats up fast, so you’re not waiting around forever. These little things all add up to a much nicer experience than older machines where you had to manually do everything.
Filament - My Adventures with PLA and PETG
A 3D printer is really only as good as the stuff you feed it, and the Creality K1 has been pretty happy to munch on different types of filament. Over the last six months, I’ve mostly been playing around with PLA and PETG, trying out filament from both Creality themselves and Elegoo. It's been a cool learning experience, and I’ve definitely found my favorites.
PLA was my starting point. It's kind of the go-to for most 3D printing. It’s easy to print with, doesn’t warp much, and comes in a ton of colors. Both the Creality and Elegoo PLA worked great in the K1. Prints came out sharp, with good detail and bright colors. I used PLA for all sorts of things: decorations, quick prototypes, and toys. The K1, with its excellent cooling and stable enclosed setup (though I often print PLA with the door or lid slightly open to prevent heat issues), handled PLA like a dream. It usually stuck perfectly to the flexible PEI build plate, and getting prints off once they cooled down was just a simple flex and pop. There's nothing wrong with PLA; it's a great material, especially if you're just starting out or making things where super strength and heat resistance aren't a big deal. It’s cheap, forgiving, and gives you great-looking results without much fuss.
But then, my filament journey led me to PETG, and honestly, I’m a total convert for a lot of my functional prints. PETG is a step up from PLA when it comes to strength, toughness, and handling higher temperatures. It’s less brittle and can take more abuse, which makes it perfect for parts that need to be sturdy. I was a little nervous at first because PETG can be a bit more finicky than PLA. It tends to string more and needs slightly higher printing temperatures.
My first few tries with PETG on the K1, using both Creality and Elegoo brands, were definitely a learning curve. I did get some of those annoying strings, but after tweaking the retraction settings in my slicer software and making sure the filament was dry (PETG soaks up moisture from the air more than PLA), things improved a lot. The K1’s direct drive extruder is great for PETG because it gives you really precise control over how the filament flows, which is key to cutting down on oozing and stringing. The enclosed chamber on the K1 is also a big help with PETG, as it keeps the temperature inside consistent, making it less likely to warp or crack, especially on bigger prints.
What I really love about PETG is that it’s slightly flexible and the layers bond together incredibly well. Parts printed in PETG feel super solid and are way less likely to snap along the layer lines compared to PLA. This has made it my number one choice for anything that needs to do a job: brackets, cases for electronics, replacement parts for things around the house, and even some tools. While PLA might win for looks on purely decorative items, PETG is the champ when it comes to toughness. I found both the Creality and Elegoo PETG filaments to be good quality, with consistent thickness and nicely wound spools. The K1 didn’t seem to prefer one brand over the other; it just happily printed whatever I loaded up. I like PETG so much now that I usually reach for it first, unless there's a specific reason to use PLA (like needing a color only PLA comes in, or a print that absolutely can't have any stringing without a lot of cleanup).
The fact that the K1 can handle these common materials so easily, and probably even more specialized stuff like ABS, ASA, or some flexible filaments (though I haven't gone too deep into those yet), thanks to its all-metal hotend that can hit 300°C and its enclosed build area, is a huge plus. This versatility means that as my printing projects get more ambitious, the K1 should be able to keep up.
The Creality Cloud Experience - It's "Okay," But Will I Pay for It?
When I got my K1, it came with a free one-year subscription to Creality Cloud. This platform tries to be a one-stop shop with a library of models, cloud-based slicing, remote printer control, and a community space. After six months of using its premium features, I have to say my feelings are a bit mixed. The service is, well, it's okay. It definitely has some handy features, but it hasn't become something I can't live without.
Let's talk about the good stuff first. Being able to control and monitor my printer remotely is genuinely useful. Starting a print from my phone while I'm in another room, or checking in on how it's doing through the camera (if you have one set up), is undeniably convenient. The app even sends you notifications when a print is done or if there’s an error, which is a nice touch. If you’re often away from your printer, this remote access could be a really big deal. The cloud slicing feature also works; you can upload a model file, slice it using preset or custom settings, and send it straight to the printer without needing your usual slicer software on your computer. This can be helpful if you’re on a device where you don't have your main slicing program installed.
The model library on Creality Cloud is pretty big, with a mix of free and paid designs. There’s a social side to it too, where people can share what they've made and follow designers. I’ve browsed through it a few times and found some neat things. If you're just starting out and don't have a bunch of your own model files or aren't yet into 3D modeling yourself, it can be a decent place to find stuff to print. Some people might also like the "gamified" parts, like earning points or badges.
However, even with these conveniences, I find myself wondering if I'll actually pay to renew the subscription once my free year is up. Right now, the answer is probably not. The main reason is that, like a lot of hobbyists, I usually end up finding models on other popular sites like Thingiverse, Printables, or MyMiniFactory, or more and more, I'm using designs I’ve made myself. While Creality Cloud has a lot of models, the selection and how they’re organized on dedicated model sites often feel more thorough and easier to search when I’m looking for something specific.
Also, while cloud slicing is handy, I generally prefer the fine-tuned control and all the customization options you get with desktop slicers like Creality Print (which is actually pretty good and what I use most often for the K1), Cura, or the increasingly popular OrcaSlicer. These local programs give me total control over every tiny print setting, letting me tweak profiles for specific filaments and models in a way that cloud slicers often can't quite match, or at least, don't make as easy. Since I'm usually at my computer when I’m getting a print ready anyway, using a local slicer and then just sending the file to the K1 over Wi-Fi (which works great even without the full cloud service for local transfers) is hardly a big deal.
There have also been a few little quirks with the Cloud service. Sometimes the connection can be a bit iffy, or the app interface feels a little less polished than I'd prefer. While these are small complaints, they add to my feeling that it’s not an essential service for me. The K1’s amazing printing ability, its core strength, doesn’t depend on Creality Cloud at all. You can run it perfectly fine using local slicing software and a USB stick or just printing over your local network.
So, while the free year has been a nice perk and let me check out what Creality Cloud offers, it just doesn't quite offer enough value for me to pay for a subscription with how I currently use my printer. If the platform changes a lot, I might think about it again. But for now, the huge amount of resources out there in the wider 3D printing community and the power of local slicing software seem to cover my needs just fine. The real star of the show is the K1 printer itself; the Cloud feels more like an optional add-on rather than a crucial part of the experience.
Finally? Six Months In and Still Totally Stoked!
So, six months with the Creality K1, and that Christmas morning excitement hasn’t worn off. Instead, it’s actually grown into a real appreciation for what an awesome machine this is. It has consistently churned out high-quality prints at seriously impressive speeds, proving to be a reliable and genuinely fun addition to my creative toolbox. Being able to easily make those timelapse videos adds another layer of enjoyment and usefulness. Exploring different filaments like PLA and PETG from various brands has been a breeze, with PETG becoming a solid favorite for its strength and durability, all of which the K1 handles like a champ.
While the included year of Creality Cloud brought some conveniences, especially for checking prints remotely, it hasn't become a must-have for my workflow, particularly since I prefer to find or design my own models and love the control I get from local slicers.
At the end of the day, the Creality K1 itself is just a fantastic 3D printer. It has held up wonderfully over these six months of pretty constant use, hasn't given me much trouble, and has delivered on its promises. If you're looking for a fast, reliable, and user-friendly 3D printer that gives you great results, the Creality K1 is definitely one you should seriously consider. It’s a machine that has truly kept on giving, long after the wrapping paper was cleaned up.